Burnt Latke
  topframe
 
spark strip
strip-install.jpg

The spark strip is a new modification which replaces traditional chamber electrodes. The strip is held in place by two short electrode screws and sparks are formed along the flat surface at the gaps. The spark strip simplifies launcher construction and helps creates a roomy, user friendly chamber. The strip does not require gap adjustments and is easy to clean without bruised and bloody knuckles. Pictured here is a spark strip being installed into the L1 during recent tests. The existing electrodes were left in place for comparison but bent out of alignment to allow the spark strip to function.

The experiment here demonstrates how a multi spark ignition works. This example uses a small 65K volt stungun as an ignition source. The 15mm default gap from the stunguns inner electrodes has been transferred to a piece of circuit board. Two wires with alligator clips are soldered to each of the default gaps electrodes which are clipped to the two outside coins. The high voltage is unable to jump across the gap created by the coins because it is larger than the default gap of 15mm. Mouse over the image to push the red coin closer to the others. This creates a smaller working gap than 15mm and the electricity is able to skip along the coins. The stungun's default gap can be increased slightly from the factory's original setting but placing the inner electrodes too far apart risks damage to the stungun. A piezo BBQ sparker has a maximum gap of about 10mm.

strip-coins-board.jpg
strip-proto.jpg

This is the first prototype of the spark strip. It is made from foam board and four wires which connect the gaps. The electricity did not cause the foam board to melt and it's paper coating showed no signs of burns or damage. The 7mm working gap wastes some available length but conducts the full 65K volts available.

This spark strip is constructed of Lexan with soldered loops of wire running through it. The working gap of this prototype is 15mm which causes the voltage to switch between the stungun's default gap and the spark strip. Both sparks were caught here with a camera during a 1 second exposure. The holes in the lexan were drilled at 12mm total but the spark does not begin to conduct until the wire has emerged from the lexan and begun to bend away from the hole. The holes would need to be moved slightly closer for this strip to work properly.

strip-lucite.jpg
strip-pcbrail.jpg

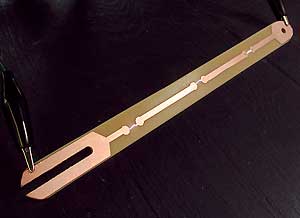
This is our final version of the spark strip which is etched into a strip of copper clad circuit board. The working gap is exactly 12 mm and conducts fat, reliable sparks. A swallow tail is cut at one end to provide fast installation and flexibility of launcher electrode placement. This printed circuit board (PCB) strip was made of copper clad board which was cut into shape with a knife, drill and file. The copper lines are called traces, these areas are covered with rub down transfers to protect them. The whole PCB is then soaked in a chemical which removes the unprotected copper.

The spark strip installs painlessly and only requires the removal of one bolt. The #6 electrodes of the L1 launcher pictured here are a bit long for this application. The L3 launcher will use a spark strip and be fitted with much shorter electrodes. The electrodes can also be thinner as the strip is unlikely to suffer accidental impact. The nuts that secure the strip do not need to be too tight because any small spaces will simply create another spark gap. Rounded cap nuts (not pictured) help create a finished look and streamline cleaning.

strip-installed.jpg
strip-30spark.jpg

The spark strip can be constructed of many materials and in limitless configurations. The circuit board here has small metal rings which creates a 30 point spark with a 14mm working gap. This setup is does not produce the loud cracking sound of the larger sparks but should faithfully ignite a proper fuel mixture. It is also possible to use flexible spark strips which can wind around the inner circumference of the chamber, helping to isolate the spark from other chamber accessories.

We tested the spark strip against the traditional electrodes using the L1 launcher and 65K stungun. A SpudTech rifled barrel at 1.3:1 and russet potatos were used to simulate real world shooting conditions. It was expected that both spark setups would record the same speeds as past testing has shown no increase in velocity from a change in spark configuration or voltage. The spark strip tested slightly faster in this test but possibly because of the general inconsistencies when using spuds as test ammunition. An upcoming test with the miniL1 will further investigate the sparks effect on velocity. Click the image to the right to view the chronograph data.

strip-data.gif
back